Using Golden Ratio to Create a Clown Map
Last updated on: 25 November, 2021
Introduction
Some time ago I’ve been looking for a way to automatically generate color ramps for clown maps. The requirements were that each of ramp’s colors should be unique and significantly different from at least several of its neighbors, while the idea was to be able to pipe geometry to a Color SOP, apply colors from ramp preset (with Ramp from Attribute) and finally pick the correct range matching the number of objects in the input geometry.
Ramp parameter of the Color SOP comes with several presets, but none of them is appropriate for material ID. Manually creating each color and changing its interpolation would be too time-consuming, so I had to look for a good algorithm that would do the work for me.
Enter: The Golden Ratio
The Golden Ratio is probably one of the most recognizable mathematical proportion. We know that its understanding dates back to ancient Egyptian times, but it has been discovered and rediscovered many times throughout the history of our human civilization. And throughout history we named it differently.
It’s possible that Proclus Lycius, Greek Neoplatonist philosopher, was the first person who officially referred to the proportion as “section” in science work. Though it is disputed by some historians that this terms indeed refers to the golden ratio1.
In his 1498 manuscript “Divina proportione” (illustrated by Leonardo da Vinci), Luca Paciolli named it the divine proportion. He was followed by other mathematicians who also used other terms like “proportionally divided”, “continuous proportion”, and similar1.
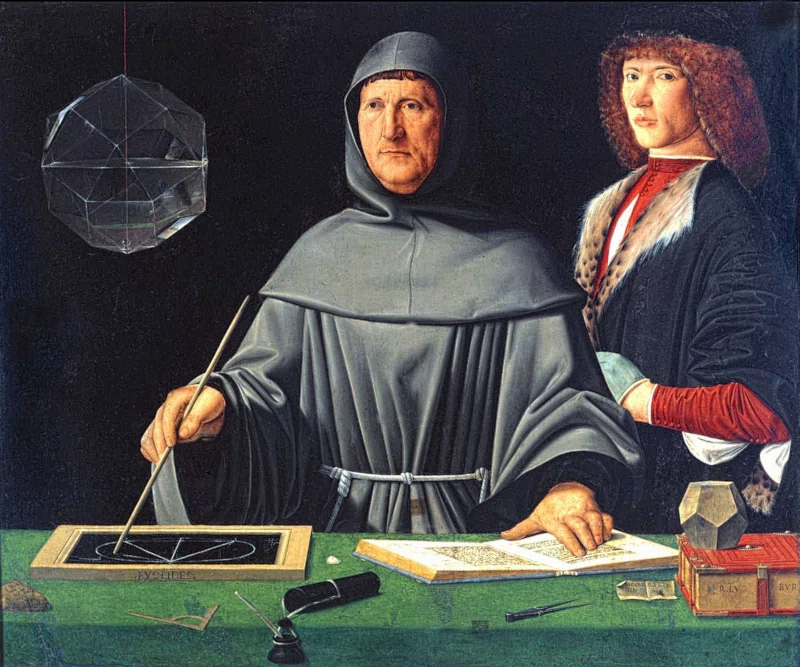
“The Portrait of Luca Pacioli” by Jacopo de’ Barbari. Dated to around 1500.
The modern term was coined by Martin Ohm in the second edition of his book from 1835 titled “Die reine Elementar-Matematik” (“Elementary pure mathematics”)1, where he named it “goldener Schnitt” (“the golden section”)2.
Today we call this proportion the golden ratio, golden number or golden section. It’s present in many fields of science, engineering, and art. Even nature itself seems to have found many uses for it, and it’s probably because of this we humans find all forms utilizing golden ratio beautiful.
But what is this golden ratio? Well, given two quantities $ a $ and $ b $, if their ratio is the same as the ratio of their sum to the larger of the two components, then their values are at golden ratio (defined by $ \varphi$ ).
Rectangle divided by the golden ratio. $\left|a\right| \geqslant \left|b\right|$.
Its mathematical definition is: $$ \varphi \overset{def}{=} \frac{a}{b} = \frac{a + b}{a} \quad : \quad a \gt b \gt 0, \quad \varphi \in \mathbb{R \setminus Q}.$$
If we try to simplify the equation, we will notice something interesting:
$$ \varphi = \frac{a + b}{a} = \frac{a}{a} + \frac{b}{a} = 1 + \frac{1}{\varphi}.$$It is in fact a recursive function! We can try expanding it ad nauseam:
$$ \varphi = 1 + \frac{1}{\varphi} = 1 + \frac{1}{1 + \frac{1}{\varphi}} = 1 + \frac{1}{1 + \frac{1}{1 + \frac{1}{\varphi}}} = \left(\ldots \right).$$Rectangle recursively divided using the golden ratio ($depth = 8$).
This is all fine and dandy, but what is the actual value of this proportion? To calculate it, we can solve a quadratic equation. Let’s start with multiplication by one:
$$ \varphi = \left. 1 + \frac{1}{\varphi} \right\vert \cdot \frac{\varphi}{\varphi},$$ $$ \varphi^{2} = \varphi + 1.$$After a bit of tidying up, we get a quadratic equation with $a = 1$, $b = -1$, and $c = -1$ coefficients:
$$ \varphi^{2} - \varphi - 1 = 0.$$Remembering the quadratic formula for the roots of the quadratic equation, which is:
$$ x = \frac{-b + \sqrt{b^{2} - 4ac}}{2a}$$we can calculate the root of our function. Actually, only the positive one, because negative number does not interest us:
$$ \varphi = \frac{1 + \sqrt{1 - 4 \cdot 1 \cdot \left(-1 \right)}}{2} =$$ $$ = \frac{1 + \sqrt{1 - 4 \cdot (-1)}}{2} =$$ $$ = \frac{1 + \sqrt{5}}{2} \approx 1.6180339887.$$Knowing the value of $\varphi$, we can calculate the golden ratio conjugate $\phi$, which is the length ratio taken in reverse order ($\frac{b}{a}$):
$$ \varphi = 1 + \frac{1}{\varphi},$$ $$ \varphi - 1 = \frac{1}{\varphi},$$ $$ \phi = \frac{1}{\varphi} = \frac{1}{1.6180339887} = 0.6180339887,$$ $$ \phi = 0.6180339887.$$Implementation
As a basis for implementation I used Martin Ankeri’s code written in Ruby and featured in his excellent article titled How to Generate Random Colors Programmatically. In Martin’s article you will also find distribution graphs for values generated by this algorithm, so I highly recommend reading it. The algorithm is extremely simple and boils down to adding $\phi$ and then mod 1 to the hue of each consecutive color.
I implemented this algorithm as a shelf tool which works on selected surface operators. User selects one of more SOPs and clicks on the tool icon. This opens a sequence of two modal dialogs containing questions about the number of colors user wants to generate, and the name of ramp parameter the tool will operate on.
For the sake of brevity, I’ll post only the code of the main loop here. To study the full code, you can visit my Git repository.
The Main Loop
Before actually creating ramp points I had to clear the existing ramp of all points:
multi = ramp.multiParmInstances()
    for _ in range(int(len(multi) / 5) - 1, 0, -1):
        ramp.removeMultiParmInstance(0)
The ramp variable stores a parameter that was provided by the user in one of the questions. In the for statement I divide its length by 5, because each item (or ParmInstance) in ramp MultiParm consists of five parameters: position, color (vector3) and interpolation. Without dividing it by 5, calculated length would be too high and the for loop would go through too many iterations.
Before entering the main loop, I had to initialize several variables:
pos = 0
hue = 0
sat = 0.75
val = 0.75
phi = 1 / ((1 + math.sqrt(5)) / 2)
Obviously, pos is the position on the ramp. I hardcoded the hue, sat and val because I always want it to start from 0 hue, and I like how 0.75 saturation and value look. The golden ratio conjugate $\phi$ is derived from equations we are already familiar with:
The main loop iterates from 0, to the number of steps that were provided by the user as the number of colors to generate by the tool. Not including the steps itself ($\left<0, steps\right)$). The very first thing I did here, is to check if the loop is currently not on its first iteration.
for _ in range(0, steps):
    if not _ == 0:
        ramp.insertMultiParmInstance(_)
This is a workaround to a funny, but understandable problem with ramps. It’s not possible to remove all points from them, so there will always be at least one point present. With this condition I simply skip the insertion of MultiParmInstance for the first point of the ramp.
To move the point to a proper position, I had to determine the name of MultiParm parameter. They are named using the following pattern: (p)(n)pos, where p is parameter name, n is MultiParm instance number (it’s basically point number on the ramp when counting from the left, and it starts from 1). For example, in Color SOP: ramp1pos, ramp2pos, and so on.
    mp_pos = f'{parm_name}{_ + 1}pos'
    op.parm(mp_pos).set(pos)
Next is the actual point generation utilizing golden ratio hue-shifting algorithm:
    hue += phi
    hue %= 1
    color = hou.Color()
    color.setHSV((hue * 360, sat, val))
    color_pt = op.parmTuple('%s%dc' % (parm_name, _ + 1))
    color_pt.set(color.rgb())
Hue is multiplied by $\phi$ in each iteration. The purpose of modulo is to keep hue within $\left(0, 1\right)$ range. The Color.setHSV() method accepts hues in degrees, so the fractional value had to be multiplied by 360. In the last two lines I first determine the name of color ParmTuple of the currently processed MultiParm instance and assign the currently processed HSV color converted to RGB.
Lastly, I’m setting point interpolation to constant to prevent smooth transitions of colors in the ramp. I’m also incrementing the position of the next point by $\frac{1}{steps}$.
    op.parm(f'{parm_name}{_ + 1}interp').set(0)
    pos += 1.0 / float(steps)
Possible modifications
There are several modifications that can be used to extend the algorithm:
- Apply golden ratio to saturation and/or value on each or every n-th iteration.
- Start from red ($hue = 0$) by initializing $hue = -\phi$ to start from 0, or ignore
hue += phion the first iteration. This should be unnecessary unless there’s a need to bake color ID for hundreds or thousands of objects. - Expose HSV parameters as function arguments.
- Export generated ramp to JSON file in
$HOUDINI_USER_PREF_DIR/ramp/.
The Result
There is no randomness in the implementation. This is by design, so that colors of each point of a given index will stay consistent between different ramps. If the ramp has to be regenerated (e.g. to add more colors), this prevents unexpected changes in existing material assignments that base off a Color ID map derived from the old ramp.
Hue distribution in relation to @ptnum seems to have a very specific pattern. Neighbors within a certain point range are always significantly different from each other. The more ramp points are generated, the closer the hue of new points will converge towards hue values of existing points, but never in a local scope.
Also, the colors will never repeat, unless at one point Python runs out of floating point precision.
Ramp points generated for a 64-color clown map. Vertical axis: hue, horizontal axis: point number. $h_{0}sv = \left(\phi, 0.75, 0.75\right)$.
Color ID ramps generated for 16 colors retain satisfactory difference in hue of each ramp point:
16-colors clown ramp generated using golden ratio. $h_{0}sv = \left(\phi, 0.75, 0.75\right)$.
Comparison with Substance Painter
I made a series of comparisons to Substance Painter’s color ID baking algorithm set to:
- Color Source: Mesh ID / Polygroup,
- Color Generator: Hue Shift.
The first test was on SideFX’s Crag test geometry with color ID baked in Houdini (generated with golden ratio) and Painter. I wanted to experience the feel of clown maps produced by both methods when applied as color map of the model.
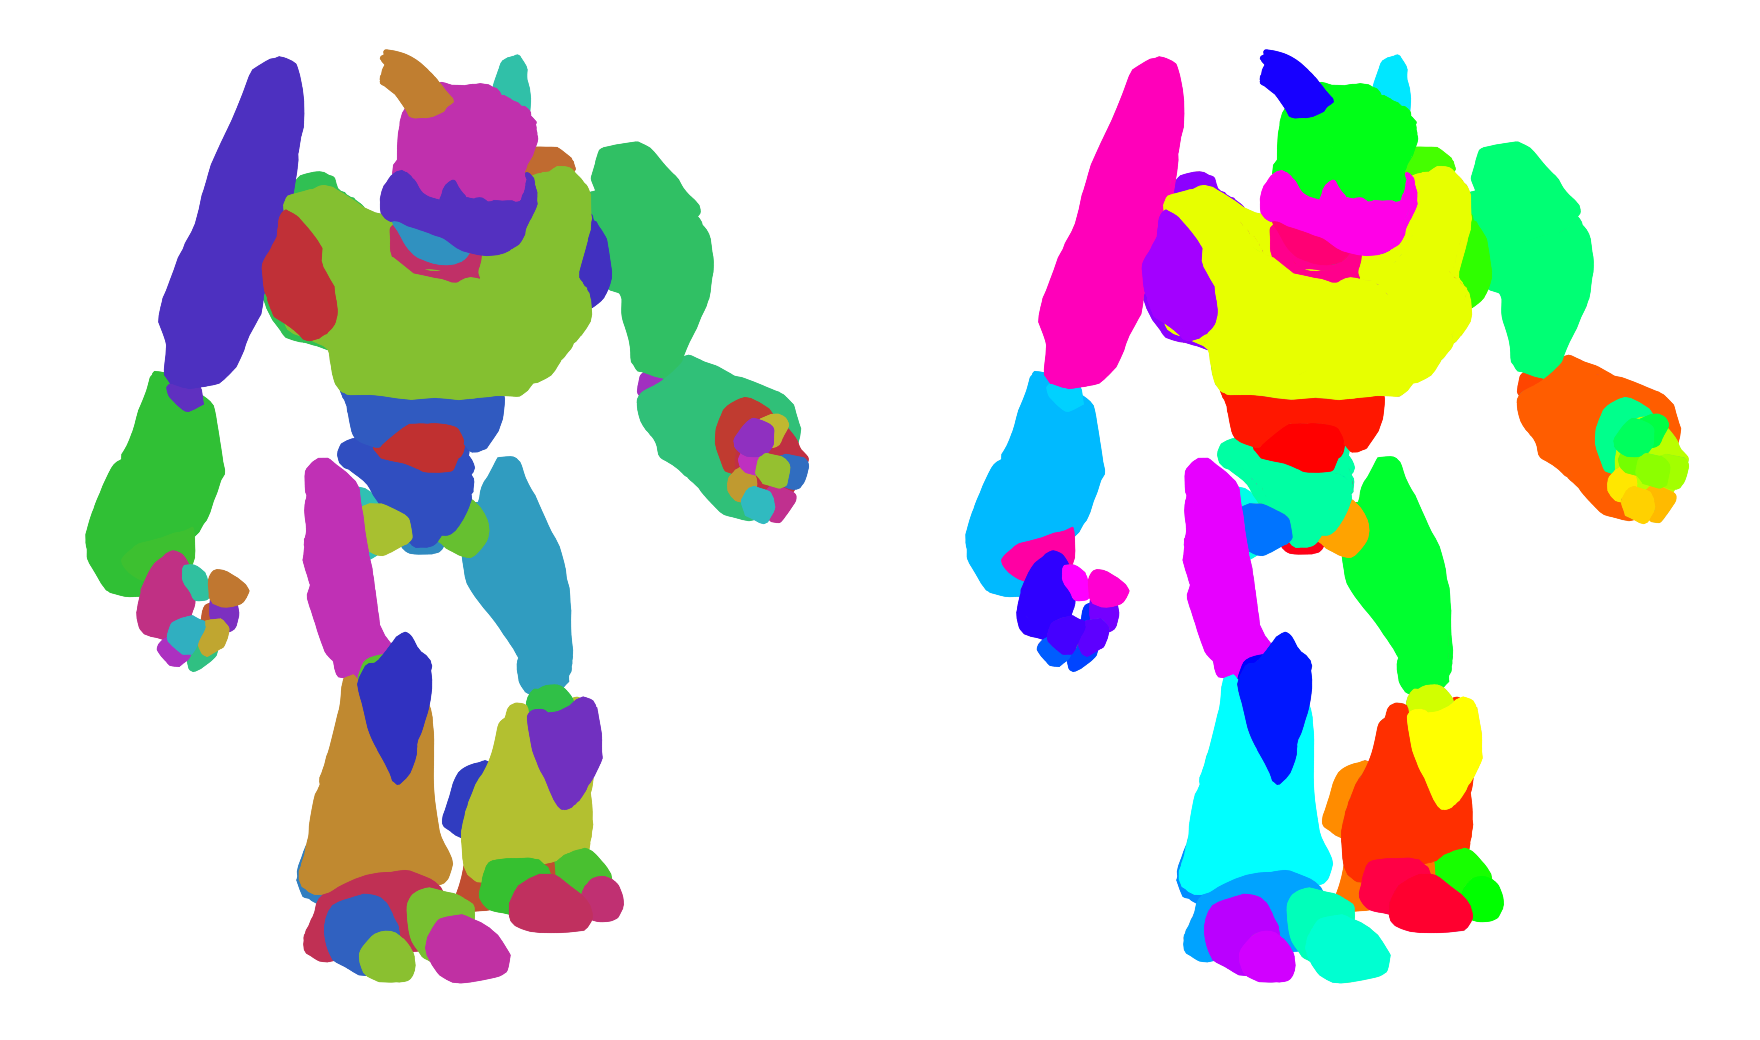
Comparison of clown maps generated for Crag test geometry. Left: map baked from point colors using SideFX Labs Map Baker. Texture generated from 66-colors clown ramp ($h_{0}sv = \left(0, 0.75, 0.75\right)$). Right: map baked in Substance Painter using Mesh ID / Polygroup and Hue Shift generator. Hardcoded $h_{0}sv = \left(0, 1, 1\right)$
Then I compared the actual texture maps. This is with saturation and value of the golden ratio generated map increased to 1, in order to match Painter’s values:
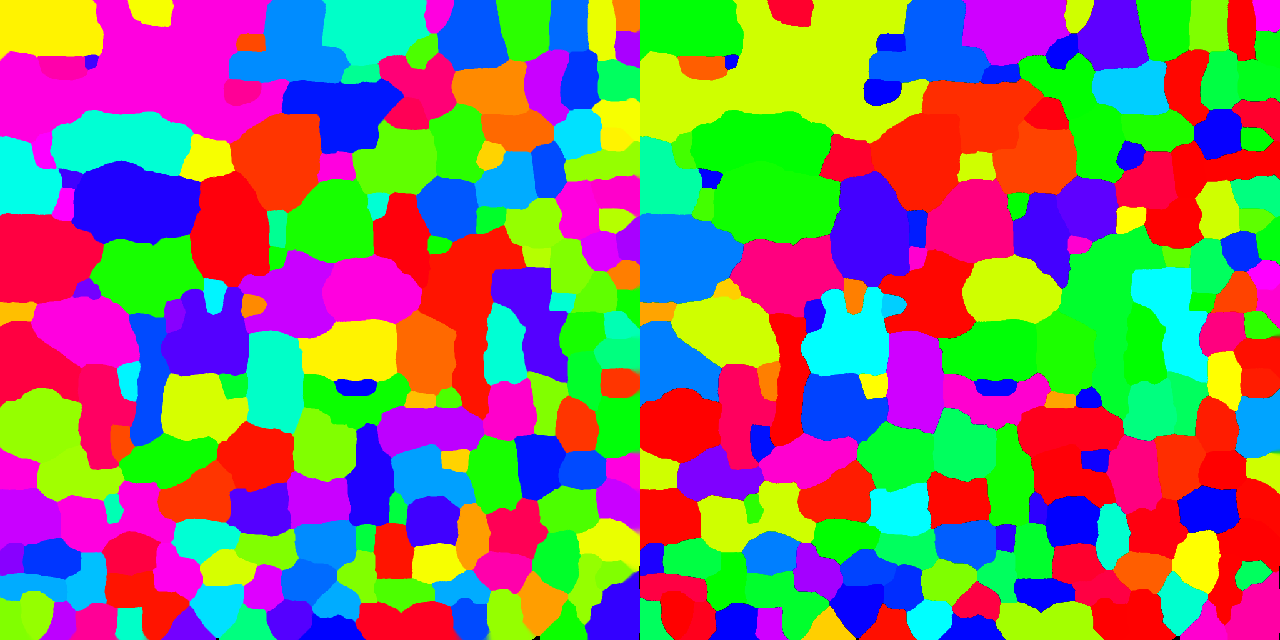
Comparison color ID maps generated for Crag test geometry. Left: map baked from point colors using SideFX Labs Map Baker. Texture generated from 66-colors clown ramp ($h_{0} = 0$, $s = 1$ and $v = 1$). Right: map baked in Substance Painter using Mesh ID / Polygroup and Hue Shift generator.
Last two tests were done with parametrically generated 100 and 768 separate object spheres stacked in columns. Their order is left to right, top to bottom. Each object receives a unique color ID:
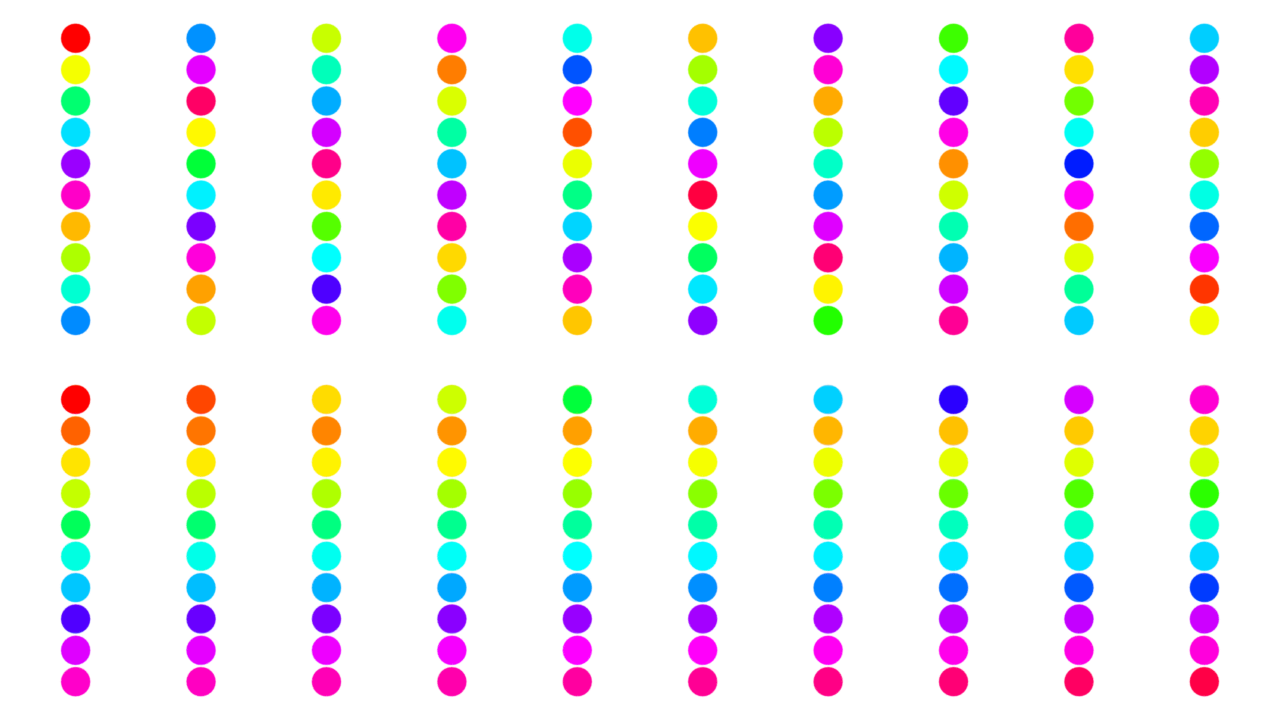
Comparison of two groups of 100 spheres with color ID map applied. Map generated by golden ratio was set to $h_{0}sv = \left(0, 1, 1\right)$ to match Painter’s settings. Upper group: baked from golden ratio ramp. Lower group: baked in Substance Painter using Mesh ID / Polygroup and Hue Shift generator. In both groups each sphere is a separate object.
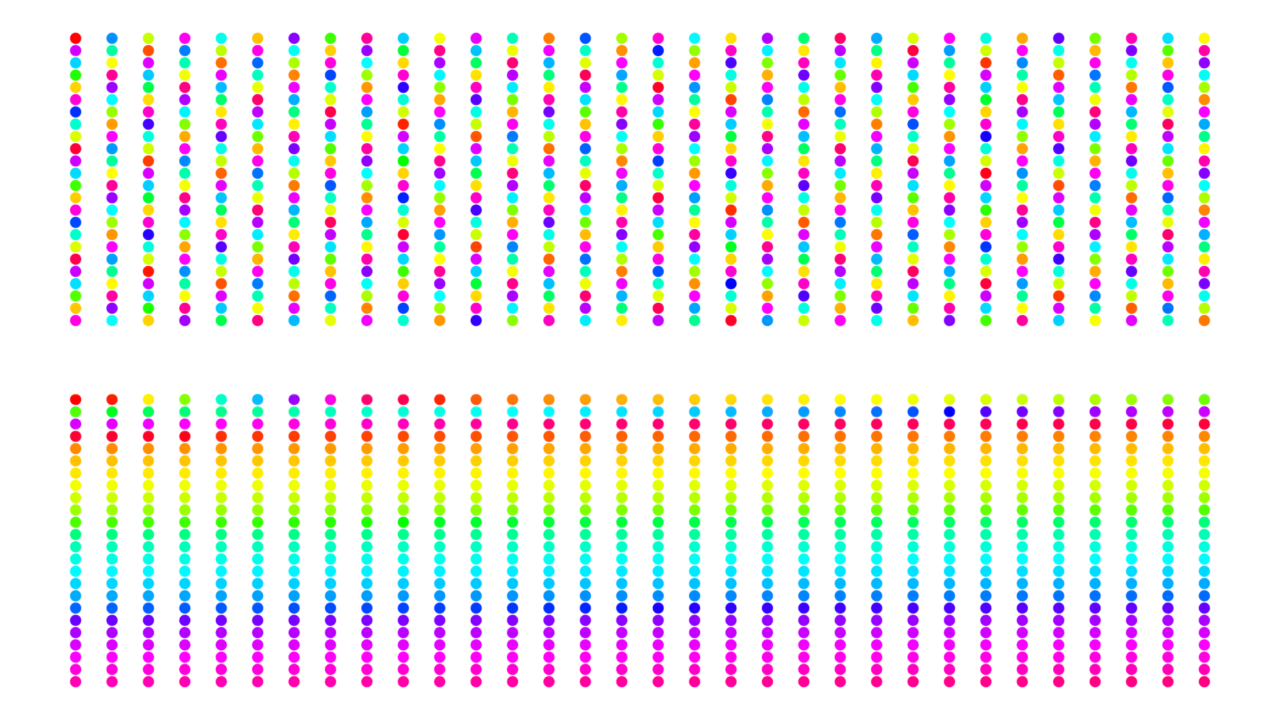
Same as picture above, but with 768 spheres per group, each of unique color id.
Substance Painter’s hue shift algorithm appears to do a full 360º hue sweep for the first several colors. Then it starts over with a slight offset and divides the full hue range between the remainder of colors, which returns a whole rainbow spectrum. In that part, the more colors the algorithm has to generate, the smaller the difference in hue each consecutive color will have.
While those tiny deltas may not negatively impact Painter’s color sampler tool that much (given a threshold is set to adequate level), they will certainly affect perception of the human eye when it comes to choosing the correct color ID in areas of similar or almost identical hue. I think golden ratio method of generating color ID has an upper hand here, as it is generally more “resilient” to the presence of high number of colors, because it generates higher hue differences in local sequences than Painter’s generator. Of course occurrence of neighboring objects with a similar hue depends on their position and the order in which they are processed, but in principle — the more colors, the better results the golden ratio algorithm will return.
The custom implementation also allows for a reduction in saturation and value of generated clown maps, which makes them much more pleasant for the eye. This is not possible in Painter, as saturation and value are hardcoded, and I bet you had a hard time looking at the last three images, which have fully saturated and bright colors.
I remember that some time ago 3D Coat had a similar problem with “factory” colors of retopo groups. Thankfully those colors could be modified by altering the retopo room color palette file and when I discovered it, this was exactly what I have done. I think last time I checked, things have changed and now 3D Coat ships with colors toned down to human-acceptable levels.